
 Wouldn’t it be great to have a digital audio player that:
- can upsample to HD,
- has a low power consumption,
- makes virtually no noise
- and can be left on for long periods?
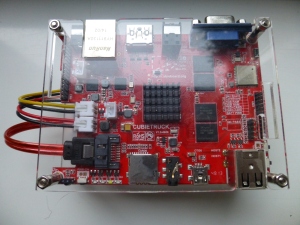
I experimented with a Raspberry Pi and Wolfson Audio card but I couldn’t get the digital output beyond CD quality with my DAC. I also fear it would not have the grunt to do sinc upsampling (see my previous article on Linux’s Secret Rabbit Code Upsampler). I did a bit of research and came across the CubieTruck, which has a much more powerful dual core processor and most importantly, an optical out. This can run at 96 kHz / 16 bit stereo and the processor has enough power to comfortably perform the least demanding sinc upsampling algorithm.
I first tested it from a micro SD card using the Cubian distribution and an external usb drive. This article is concerned with a more long term setup with the operating system and music on a 2.5″ SATA laptop drive. I posted some pictures here.
The CubieTruck is controlled remotely by both Android and my U36J Laptop (got to work it in somewhere). The CubieTruck uses a digital optical output (TOSLINK) to my normal standalone hi-fi DAC connected to the rest of the hi-fi as usual. The components shown are indicative and do not necessarily appear in my system.

Contents
I am not going to talk about how to assemble the CubieTruck and HDD system, instead I will go through the software side:
- Flashing Lubuntu to the nand memory
- Moving the root file system from the nand memory to the hard drive
- Copying music to the HDD
- Other CubieTruck configuration
- Setting up mpd and pulseaudio
- Front ends and file transfers
- Results & conclusion
Flashing Lubuntu to the nand memory
I am using a Western Digital Red red 1TB notebook drive. Here is a video showing the install process: http://www.youtube.com/watch?v=2SA-6Wj_kN0. My main O/S on the laptop is currently Kubuntu 14.04 rather than Windows so I need to deviate from the video’s instructions. Here is the link to the software download area: http://docs.cubieboard.org/tutorials/a20-cubietruck_lubuntu_server_releases. Some additional instructions can be found at: http://linux-sunxi.org/LiveSuite; download LiveSuit for Linux from here. Open with Archive Manager, extract somewhere (e.g. Downloads). Using a terminal, navigate there and follow the Chinese instructions in the ReadMe. In the unlikely event that you are not fluent in Chinese, here are the commands to run:
chmod +x LiveSuit.run
./LiveSuit.run
If you are like me, you will get an error:
Package dkms is not installed.
The guide helpfully tells you how to fix this with:
sudo apt-get install dkms
After this has finished, relaunch and eventually should get something like:
========***********LiveSuit installed completely***********===========
LiveSuit has been installed in /home/martin/Bin/LiveSuit
========***********LiveSuit installed completely***********===========
The next instruction is a bit weird as the Chinese mentions ‘bug’ and Ubuntu 10.04, but I thought I’d give it a go anyway. This may not be necessary. Create /etc/udev/rules.d/10-local.rules in an editor and add the following:
SUBSYSTEM!="usb_device", ACTION!="add", GOTO="objdev_rules_end"
#USBasp
ATTRS{idVendor}=="1f3a", ATTRS{idProduct}=="efe8", GROUP="test",
MODE="0666"
LABEL="objdev_rules_end"
Then restart the udev service using: sudo service udev restart.
Now it is possible to run the flashing software from the aforementioned /home/martin/Bin/LiveSuit using something like:
cd ~/Bin/LiveSuit/LiveSuit
./LiveSuit.sh
This should produce:

Now we need to grab an Operating System image – I tried http://linux-sunxi.org/A20-Cubieboard/Nand_Images_%28Lubuntu%29 for the most up to date set of Lubuntu images, but it didn’t work. I had more luck at http://dl.cubieboard.org/software/a20-cubieboard/lubuntu/ where I first chose the lubuntu-server-nand-hdmi.img.gz image because I want to use an hdmi connection to get to a terminal. Way down the line, this still caused problems (after resizing the root file system on the HDD). Third time lucky was the lubuntu-desktop-nand-hdmi.img.gz. Click on the download link and save it to the Downloads directory. You can uncompress it using:
gunzip lubuntu-desktop-nand-hdmi.img.gz
This creates an image file you can select in LiveSuit. Make sure you have connected the CubieTruck’s micro usb to a usb port on the computer, otherwise it can’t communicate. I also connected a keyboard, mouse, ethernet and hdmi cable. The power key is a tiny button next to the IR sensor, opposite the power socket. I followed the video’s instructions: hold down the FEL button (on a different edge of the device), connect the usb to the PC and wait until this window appears:

I selected Yes. Eventually, if you see lots of lights flashing, it may be working, so look at the monitor to confirm. At this point, the keyboard refused to work. I rebooted, changing to use the power cable rather than usb, and then it was ok. You get put into a root session so you need to add some security configuration. – passwd to change root’s password. This O/S version has ssh already installed with a userid & password of linaro. You need the IP address of the device so can use sudo ifconfig and look at the eth0 entry. Once in, you can upgrade the security: – sudo vi /etc/ssh/sshd_config to change Port 36000 and PermitRootLogin no – make sure you can log in and out with linaro before getting rid of any root session. Add these lines to the bottom: UseDNS no and AllowUsers linaro, restart the ssh server with sudo reload ssh. exit from the box and ssh back with something like ssh -Xp 36000 linaro@192.168.0.25. This should work as is connecting on the new port and whatever IP number you need.
Moving the root file system from the nand memory to the hard drive
This allows the Operating System to boot from the hard drive and is much faster. There are instructions at http://docs.cubieboard.org/tutorials/ct1/installation/moving_rootfs_from_nandflash_to_hard_drive. To format the disk, you can use gparted:
sudo apt-get install gparted
First, choose /dev/sda from the dropdown at the top right, use Device->Create Partition Table and then make a 2Gb ext4 partition (select the first entry in the list) using Partition->New:
 After this, click on the tick to implement the change. I went through a number of different possibilities that failed further on down the line. It’s especially important to not create a partition the full size of the disk. The resize2fs command is supposed to handle this but I couldn’t get it to work. Setting to 2GB, copying the OS and then resizing was painless.
 This shows the output of a successful create. Then we need to copy the nand contents and alter the booting on nandb to make /dev/sda1 the bootable device using the rest of the commands in the tutorial. After this, we can restart gparted to extend the partition (and the enclosed filesystem) to the full size of the disk by selecting the partition, choosing Partition->Resize/Move and dragging the right hand bar:

After a few minutes, this should come back with:

Now reboot the computer and check the filesystem is mounted correctly using the new size using df -Th:
Filesystem    Type     Size   Used  Avail Use% Mounted on
/dev/root     ext4     917G  1014M   870G   1% /
devtmpfs      devtmpfs 889M   8.0K   889M   1% /dev
tmpfs         tmpfs     20M   4.0K    20M   1% /tmp
none          tmpfs    197M   228K   197M   1% /run
none          tmpfs    5.0M      0   5.0M   0% /run/lock
none          tmpfs    985M   132K   985M   1% /run/shm
none          tmpfs    100M    12K   100M   1% /run/user
The first line shows the disk is now 917Gb. The original 1TB has been reduced by quoting in powers of 2 (10^9 / 1024^2=954) and possibly by installing the ext4 file system. Does anyone know more precisely where the rest went? I’m not fussed by the discrepancy as it is normal.
Copying music to the HDD
This of course depends on where you have your music. I ambitiously tried to have both the HDD and an external USB drive running off the CubieTruck but it didn’t boot. I then attached the usb drive to a different computer on the same network, navigated to a directory called playable where I store the music I want and then use this command to transfer to a directory Music under the linaro home directory:
scp -rP 36000 playable linaro@192.168.0.25:Music
This can take a long time but you can monitor progress using file properties to show the size of what has been transferred and iotop to show the transfer rates.
Other CubieTruck configuration
Setting the timezone
Change the following command as appropriate, then use date to check:
ln -sfn /usr/share/zoneinfo/Europe/London /etc/localtime
Turn off the graphical display manager to preserve system resources
This means disabling lightdm and then the X windows system:
echo "manual" | sudo tee -a /etc/init/lightdm.override
You can restart the GUI at any time from a terminal by using startx.
Useful commands to put in your .bashrc
alias mps='ps aux|grep -E "mpd|pulse"'
alias go='sudo service mpd start'
alias off='sudo shutdown -h now'
These allow fast checking and starting of the mpd daemon and turning off the CubieTruck. These are particularly useful when accessing from an ssh terminal on a smartphone.
Overclocking / Solving Stuttering and Dropouts / CPU frequency setting
There is a problem in the default Lubuntu configuration with audio stuttering and dropouts on the lowest sinc upsampling quality level (see later). This can be fixed by changing the speed of the cpu. I don’t think this qualifies as real overclocking as it is just changing the cpu scheduling algorithm. To examine the current speed, change to a higher value and check again, use:
sudo cat /sys/devices/system/cpu/cpu0/cpufreq/cpuinfo_cur_freq
720000
sudo echo performance > /sys/devices/system/cpu/cpu0/cpufreq/scaling_governor
sudo cat /sys/devices/system/cpu/cpu0/cpufreq/cpuinfo_cur_freq
1008000
So we can see this has been changed to 1.008GHz. To change back use:
echo fantasy > /sys/devices/system/cpu/cpu0/cpufreq/scaling_governor
Don’t ask me where this name came from! However, this does not persist over a reboot. When I initially tried the Cubian distribution from an SD card, I had no problems with skipping / dropouts. I went back and checked and the frequency value that it uses by default is 1008000. That distribution has many more governor algorithms (conservative powersave userspace fantasy interactive ondemand performance).
To set this as a persistent value:
sudo apt-get install cpufrequtils
create file /etc/default/cpufrequtils containing:
# valid values: fantasy performance
# get them from cat /sys/devices/system/cpu/cpu0/cpufreq/scaling_available_governors
GOVERNOR=”performance”
The cpufreq-info command can tell you all about the current state of the system.
If you wish to experiment with overclocking, you can test it using a command of the form:
root@cubietruck:/sys/devices/system/cpu/cpu0/cpufreq# echo 1200000 > scaling_max_freq
I didn’t get any benefit out of this so I didn’t investigate how to make it permanent.
Overclocking / Solving Stuttering and Dropouts – RAM speed (doesn’t seem to work)
To adjust the RAM clock speed, we need to edit the CubieTruck equivalent of a PC’s BIOS, which is held on the NAND memory. The process is described here. It would be wise to take a backup of this file before messing around:
sudo su
mkdir /mnt
mount /dev/nanda /mnt
cd /mnt
bin2fex script.bin > script.fex
vi script.fx

Find the line that has
dram_clk = 432
You can change this in increments of 24, but, as in everything like this, BEWARE! I accept no responsibility for anything breaking!
dram_clk = 456
Then you need to convert it back to the binary format and reboot. If you mess up, you need an alternative way of recovery – I have an sd card with Cubian on it which I can use for this purpose.
fex2bin script.fex > script.bin
reboot
The instructions here are for a different board but they seem to be able to be used to show the speed of the RAM. When I tried this it still showed the original 432MHz so I was unable to tell if this utility was just wrong, or if the previous steps had not worked correctly. I did a cold restart but it didn’t help and I didn’t see any improvement in upsampling performance.
HDD Spindown
The HDD spin down settings can be configured directly with hdparm:
sudo apt-get install hdparm
To show current values use:
sudo hdparm -I /dev/sda
I am using a Western Digital Red drive, which it is possible to configure to spin down using the following configuration in file /etc/hdparm.conf:
/dev/sda {
        apm = 10
        spindown_time = 120
}
The values are a bit arbitrary, apm stands for Advanced Power Management. If it is over 127, then there will be no spin down and the closer to 1 it gets, the more slanted towards power conservation at the expense of performance the drive behaves. However, information is scant and what is there seems to apply to IDE drives, whereas this is SATA.
The spindown_time is measured in units of five seconds so 120 means 10 minutes with no activity before the drive stops spinning.
Setting up mpd and pulseaudio
This involves installing and configuring mpd the music player daemon, the pulseaudio sound routing software and enabling spdif out on the CubieTruck, which we will do first.
The spdif output must be enabled via kernel modules. The names of the modules in /lib/modules/3.4.79/kernel/sound/soc/sunxi/spdif/ must be added to /etc/modules. These are sndspdif sunxi_sndspdif sunxi_spdif and sunxi_spdma (see also http://linux-sunxi.org/Fex_Guide). You can just reboot to get the kernel to pick these up.
Mpd is a music file database and server. It has no way of receiving instructions directly from the user and needs at least one front end program to communicate with it. Pulseaudio is audio routing software and has many abilities, including resampling. It comes with some configuration utilities that are worth exploring:
sudo apt-get install mpd
sudo apt-get install pulseaudio pacmd pavucontrol
Whilst you can do configuration on a per user basis, here we want to be able to play music just by firing the device up. We need to modify the system configuration file in /etc/mpd.conf. There is info in the file itself and an Ubuntu guide. This contains lots of fun stuff, but the items I want to play with are:
- change playlist_directory “/var/lib/mpd/playlists” to “/home/linaro/Music/playable”.
- uncomment port “6600” (remove the # from the start of the line).
- uncomment gapless_mp3_playback “yes”.
- uncomment auto_update “yes”.
- uncomment user “mpd”.
- change bind_to_address “localhost” to “192.168.0.25” (this should be the actual ip number of the CubieTruck given by sudo ifconfig).
- I have tried various audio routings, but the one that seems to me to give the best result is to use pulseaudio, which we can configure mpd to use. We need to comment out the audio_output { type “alsa” …. }; all lines between the open and close brackets. By the way, the mpd documentation mentions SRC, but says that it needs to be compiled in with mpd to function. My listening tests and low cpu usage indicate that it wasn’t. This is an avenue worth exploring for performance improvements – basically, compiling mpd from source.
- To enable pulseaudio, find the audio_output { type “pulse” …. } section and uncomment it. Leave the server line commented out. The sink line refers to the device that is playing, which we want to be the optical out. Set this to “alsa_output.platform-sunxi-sndspdif.0.analog-stereo”. This value is found in the output of the command pacmd list-sinks.
Here are a few useful things to know about mpd:
- There is a log file in /var/log/mpd/mpd.log that can be inspected to check for errors and to see in general what mpd is doing.
- Start with sudo service mpd start
- Stop with sudo service mpd stop
- Stop and start with sudo service mpd restart
- Check if running with with sudo service mpd status
- You can increase the amount logged by setting log_level “verbose” in /etc/mpd.conf, but don’t forget to turn it off when no longer needed.
Pulseaudio configuration is set by editing /etc/pulse/daemon.conf (see my Secret Rabbit Code article for more details):
- Set resample-method = src-sinc-fastest. You must also remove the semicolon to uncomment it. The benefit of having changed the clock speed is that this algorithm is very stable. If you don’t mind instability, you might be able to use the src-sinc-medium-quality algorithm. There is a worthwhile quality jump to be had, but if you get too many dropouts you may wish to consider other tweakery or dropping down to the less demanding setting. This choice may also depend on the sort of file you are playing, and therefore the amount of processing needed to decode it. I am mainly using 44.1kHz flac. If you can get this to be stable, please let me know how!
- Set default-sample-format = s16le. This is the default, but we might as well be explicit about it. The maximum bit depth of the CubieTruck hardware is 16 bit.
- Set default-sample-rate = 96000. This is the maximum sample rate of the CubieTruck.
- Set high-priority = yes. This is the default. We want to make this a high priority process, never mind security!
- Set nice-level = -20. This gives the process the highest priority we can give it.
- Set realtime-scheduling = yes. The default, but we really mean it.
- Set realtime-priority = 10. I’m not completely sure about the benefits of changing this, but increased it to 10 with seemingly no ill-effects.
With these settings, when you use top to inspect the running processes, pulseaudio and mpd sit happily at the top of the table.
Information about the capabilities of the CubieTruck’s sound card can be found by using:
linaro@cubietruck:~$ cat /proc/asound/card2/pcm0p/sub0/hw_params
access: MMAP_INTERLEAVED
format: S16_LE
subformat: STD
channels: 2
rate: 96000 (96000/1)
period_size: 8192
buffer_size: 32768
Other useful things about pulseaudio:
- To actually kill it, you might need to set autospawn=no in /etc/pulse/client.conf. Don’t forget to set it back otherwise it won’t start when the machine boots.
- Start and stop with pulseaudio –start and pulseaudio -k (note, no sudo when running in the default “user” mode). In practice, I find killing the processes more effective, and I don’t have to do the step above.
- There is no log file, if you have changed the configuration and want to see what is going on, consult this article.
Front ends and file transfers
You cannot interact with mpd directly since it is a daemon; you must go via some kind of front end program. These are just some examples from the vast number available that I like:
 – Android: mpdroid, this is a reasonably functional piece of software with quite a nice clean aesthetic. It is really convenient to be able to control mpd from your phone. Configuration is pretty easy, under Settings->Default Connection Settings, set the Host name/IP e.g. 192.168.0.25. Set the port to 6600 and that’s about it. If it doesn’t connect, make sure you have explicitly used the IP address (not localhost) in mpd.conf above.
I also use JuiceSSH as an ssh client to log into the box so that I can turn it off cleanly and do some quick diagnosis of any problem.
– Linux Laptop (another reference to the title of this blog): I’m using gmpc which I really like as it can present views of both the directory structure (where I keep files organised by format) and by tags. You can set up global keys that allow you to pause, play, skip, change volume and more without having to navigate back to gmpc. Ah! kde:
 – Windows: I have used Auremo, which is pretty basic, but it does work on Windows 7.
My favourite ripping software is EAC because of the high quality output (use the wizard to configure it). This means my files need moving from a Windows computer to the CubieTruck. The normal Windows ssh client to use is PuTTY. This comes with a command line file copying program pscp. Here is an example of a MSDOS command to do this. Navigate to the directory where you want to copy from and use:
pscp -r -P 36000 "O* "linaro@192.168.0.25:Music/playable/EAC FLAC/Pink Floyd"
This will recursively copy (copy the directory and its contents) the album starting with “O” to the remote Pink Floyd directory. Depending on your settings, you can get dropouts while the transfer is in progress. This is not much of a problem for me when using the lowest quality upsampling algorithm. I wonder which album this is copying?
Results and conclusion
This project is able to do the minimum necessary to get sinc upsampling to work. It features a cool piece of hardware and the audio results are really excellent. It is nifty to be able to control mpd by many different remotes depending on your needs. The system is much more flexible than a preconfigured audio streaming device and it has the unassailable advantage of the stunning sound quality from existing digital sources. The hardware is being pushed by the upsampling as proven by the dropouts only being resolved by increasing the cpu frequency. I’m not sure this is cpu bound due to:
linaro@cubietruck:~$ mpstat -P ALL
Linux 3.4.79 (cubietruck)       07/13/14        _armv7l_        (2 CPU)

21:14:30     CPU    %usr   %nice    %sys %iowait    %irq   %soft  %steal  %guest   %idle
21:14:30     all   11.67    0.00    3.26    0.34    0.00    0.65    0.00    0.00   84.09
21:14:30       0   17.20    0.00    4.57    0.49    0.00    1.29    0.00    0.00   76.45
21:14:30       1    6.21    0.00    1.97    0.18    0.00    0.02    0.00    0.00   91.61
This is taken during audio output and shows the 2 cores largely idle. The upsampling looks like it is taking place in core 0.
This infrastructure is not for everyone though, it is not simple to set up and debug so cannot be a replacement for a consumer unit. For those that can cope with the technical difficulty, where else would you be able to get this level of functionality for this sort of price? I don’t know of any consumer unit that can do this. I expect DACs will all go this way at some point, once they have got some decent processing power in them. In the meantime, us Linux users can get a glimpse of the future now.
Are there any gotchas? Well yes, the sailing is quite turbulent:
- Sometimes mpd does not start when the machine is turned on. One cause is if the machine is turned off while music is playing, so stop the music before shutting down. Even so, mpd can still fail to start. The workaround is to ssh into the box and start it manually using the command given earlier.
- CubieTruck has constantly flashing lights which can be a bit of a distraction – I’m sure there is a way to turn them off – or you can just put the box out of sight. This also fixes the small amount of hard disk noise that can be detected if you are close by.
- The unit needs more power than is given by most usb power supplies, but the cable is a usb cable. I was able to use a powered usb hub from my Raspberry Pi, but I wanted to keep this for RPi use only. I eventually plumped for an expensive unit from Maplin’s. This is able to supply many different voltages and has adaptors for lots of different power inlets so I don’t need to use usb at all. It is nominally a 4A transformer, but the plug supplied has a 3A fuse! Go figure.
- My HDD is a 2.5″ 1TB drive. If more space is needed, other possibilities are to go for a 3.5″ drive (with an extra power supply board) or to use an external drive or NAS via nfs.
- The very start of the music often seems to get cut off when you press play for the first time.
- I was unable to overclock the RAM and so the ability to get a stable medium upsampling algorithm seems just out of reach.
- Cubian was able to fully turn off the device, Lubuntu leaves it partially shut down with some lights on. I then turn it off at the mains plug – has anyone found how to fix this?
What improvements could be done for future projects? The main two are to be able to go to the best upsampling algorithm (src-sinc-best-quality) and to go to higher sampling rates (192kHz, 384kHz?). It is possible that upsampling could create more significant digits so moving to 24 / 32 bit may have an effect, but I’d need to test it to see if it was audible. 24 bit may help when using a digital volume control. I would also need a new hi-fi DAC as mine is only capable of input at 96kHz / 24 bit.
A more powerful upsampling algorithm means a more powerful computer. My desktop (core i7, 1st gen) can do it, so a modern i3 could probably do it too, but it makes more noise and consumes more power than the CubieTruck. This is where my longer term research (er, playtime really) is heading so any help here would be appreciated.
Incidentally, there is a CubieTruck 8 on the horizon. Check out these photos showing an amazing metal case, great pictures of the CubieTruck and a few other bits and bobs. Even so, despite the monstrous processor, CubieTruck 8 won’t be of use for this application as it looks like it has no SATA or optical out. Eight cores though!

mdhalien
/ November 19, 2014Had a bit of a problem starting the GUI environment using startx but this worked:
sudo service lightdm start
delivers mario games
/ February 15, 2015I’ve read a few good stuff here. Definitely value bookmarking for revisiting.
I wonder how much attempt you place to create this type
of fantastic informative web site.
online dating
/ February 22, 2015Its not my first time to visit this website, i am browsing this web
page dailly and obtain nice facts from here every day.
Gary Hall
/ December 12, 2015Really useful information, thanks. I’ve had a Pi for a few years now but am seriously considering adding a cubietruck too.